How to get started with HyperFrames Studio, HeyGen's free AI video editor: setup, 5 real builds, free prompts, and an honest good/bad/ugly verdict.
HyperFrames Studio is HeyGen’s new desktop app for making videos with AI. You describe what you want in a chat box, your Claude, Codex, or Grok builds it, and you fix it on a timeline or by drawing right on the screen. My honest take after a few days of testing: it’s a day-one app and it feels like it, but it’s the easiest way I’ve seen for a beginner to go from prompting AI videos to actually editing them.
What is HyperFrames Studio?
HyperFrames is an open-source tool from HeyGen that lets your AI agent make videos out of code.
And honestly, for a long time, it was kind of a nerdy tool. You had to open Claude Code or Codex in the terminal, type “hyperframes,” use it like a skill, and then wait and hope the file that came back was good. You couldn’t really see what was happening under the hood.
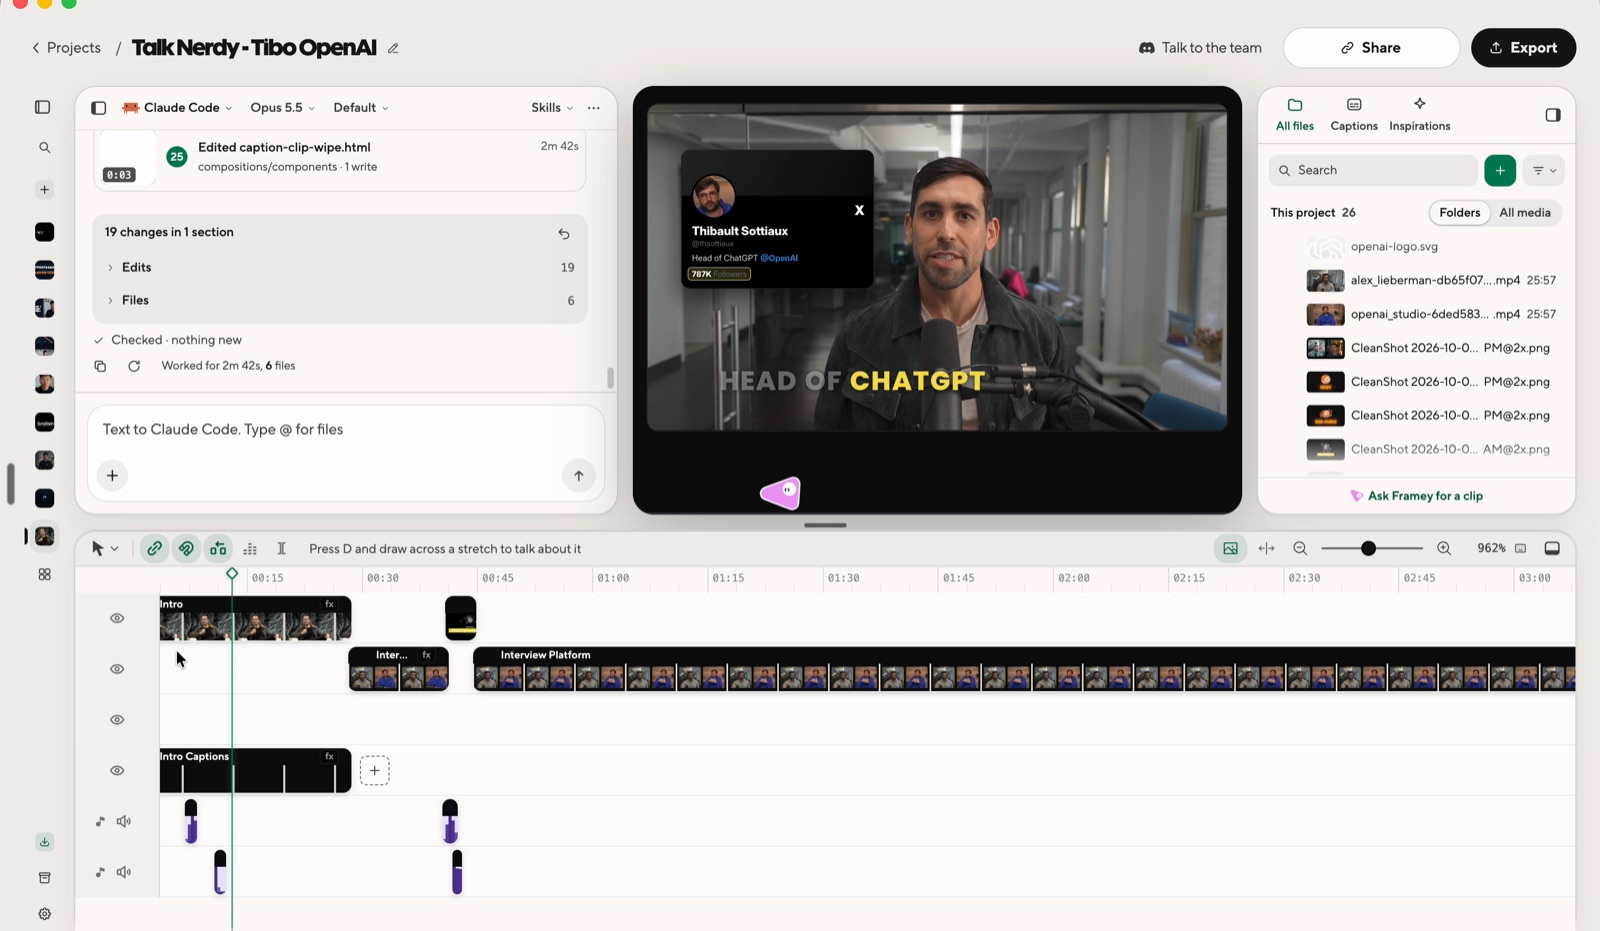
HyperFrames Studio, which launched on October 5, puts a real app on top of it. The terminal is just a chat box now. You type what you want, the AI builds it, and you can actually see it on a timeline — it’s a real video editing tool!
The big feature that makes HyperFrames so useful: if something’s off, you can draw on the screen and tell AI what to fix.
The way I think about it: Canva did this for people who aren’t designers. HyperFrames Studio could do it for people who aren’t editors.
How to Install and Set Up HyperFrames Studio
What you need
There are three things you need to get HyperFrames up and running on your machine, and one catch that makes it different from Canva:
- An AI subscription. Claude, Codex, or Grok. That’s what actually does the work, so that’s what you pay for.
- A Mac or Linux computer. Windows is coming, but it isn’t out yet.
- Nothing else. The app itself is free and open source, and rendering on your own machine doesn’t use HeyGen credits.
The catch: Canva works the second you open it on the web. Here, you have to connect your AI first. It’s a few minutes, but it’s not zero.
Step-by-step setup
Setup takes about 10 minutes. Studio does most of the work, but you’ll probably touch the Terminal once.
- Download the app from hyperframes.dev/studio. On Mac it’s a disk image with an installer inside; on Linux it’s an AppImage.
- Open it and sign in with a HeyGen account.
- Connect your AI. Studio shows each agent’s status: Ready, Not signed in, Not installed, or Installed, but won’t start.
- Claude Code: Studio installs it and opens the sign-in for you. If a step fails, it shows you two Terminal commands to run instead.
- Codex: Studio shows you the install and sign-in commands. Copy them into Terminal, then click Check again.
- Make your first video. The Create your first video card asks for your website or your idea.
Prefer to install your AI yourself?
If Studio’s helper gets stuck, these are the official commands for Mac and Linux. Open Terminal (Cmd + Space, type “Terminal”), paste one block, and press Enter.
Claude Code
curl -fsSL https://claude.ai/install.sh | bash
claude
The second line opens Claude Code. Follow the sign-in in your browser.
Codex
curl -fsSL https://chatgpt.com/codex/install.sh | sh
codex
The second line opens Codex. Choose Sign in with ChatGPT.
See “command not found”? Close Terminal, open a new window, and try again. Then go back to Studio and check your agent’s status.
How to Use HyperFrames Studio: A Quick Tour
Here’s how to use HyperFrames Studio: what you see when you open the app, and the four features worth knowing first.
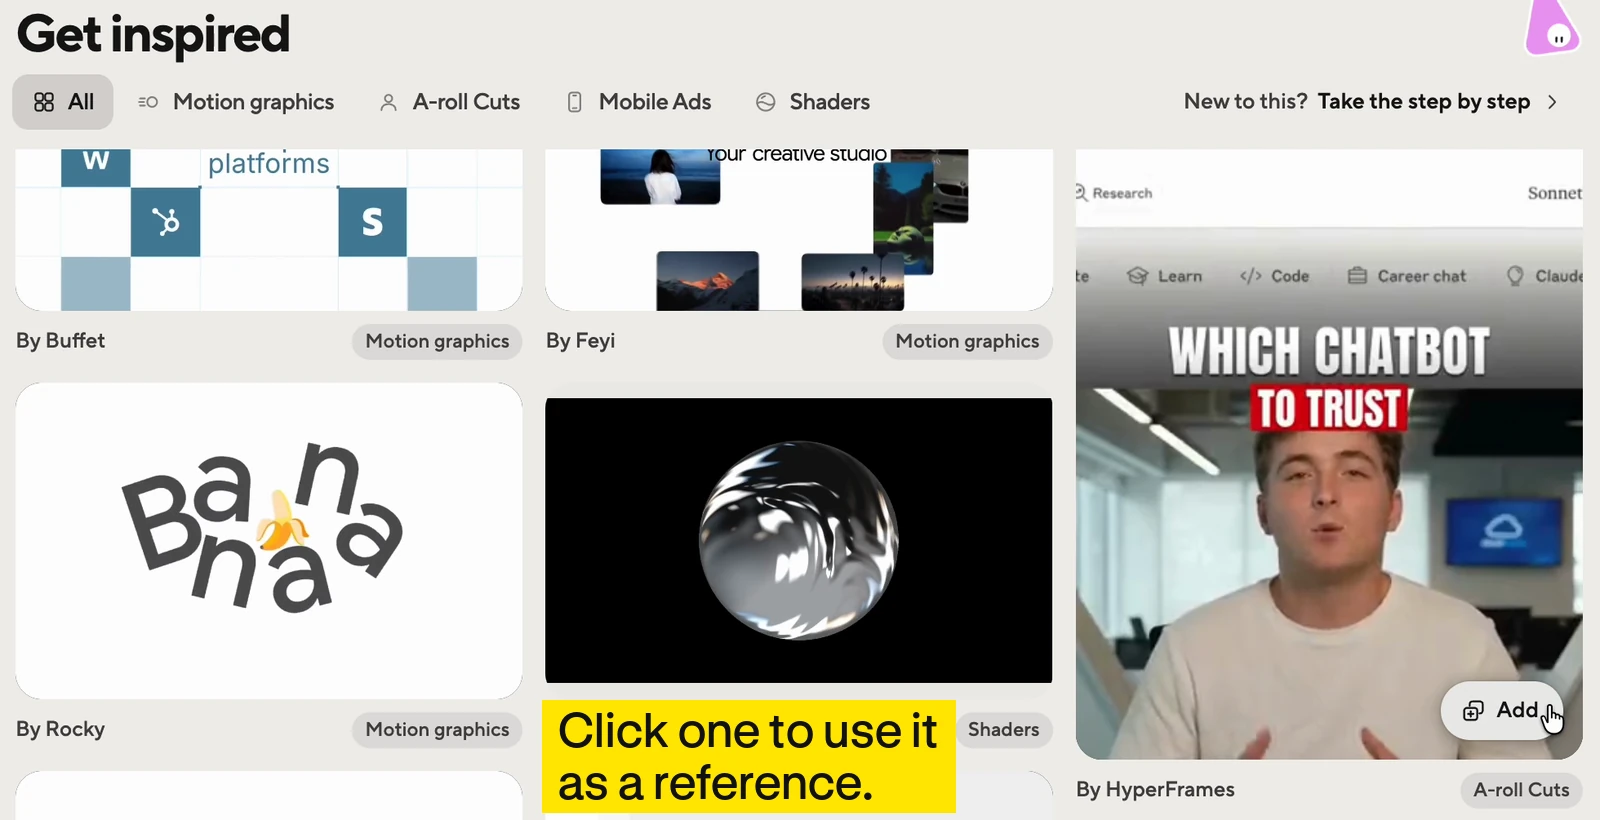
1. Get Inspired. These are what they call inspirations. Think of them like Canva templates. Click one you like and it becomes a reference for your video. Super useful if you don’t know exactly what you want, but you know it when you see it.
The app launched with hundreds of inspirations and templates. They also run a community site, hyperframes.dev, where people publish and remix their own projects. I couldn’t confirm whether community projects show up inside the app yet. You can also tag your own past projects with @ in a prompt and remix them, which is handy once you’ve made a few things you like.
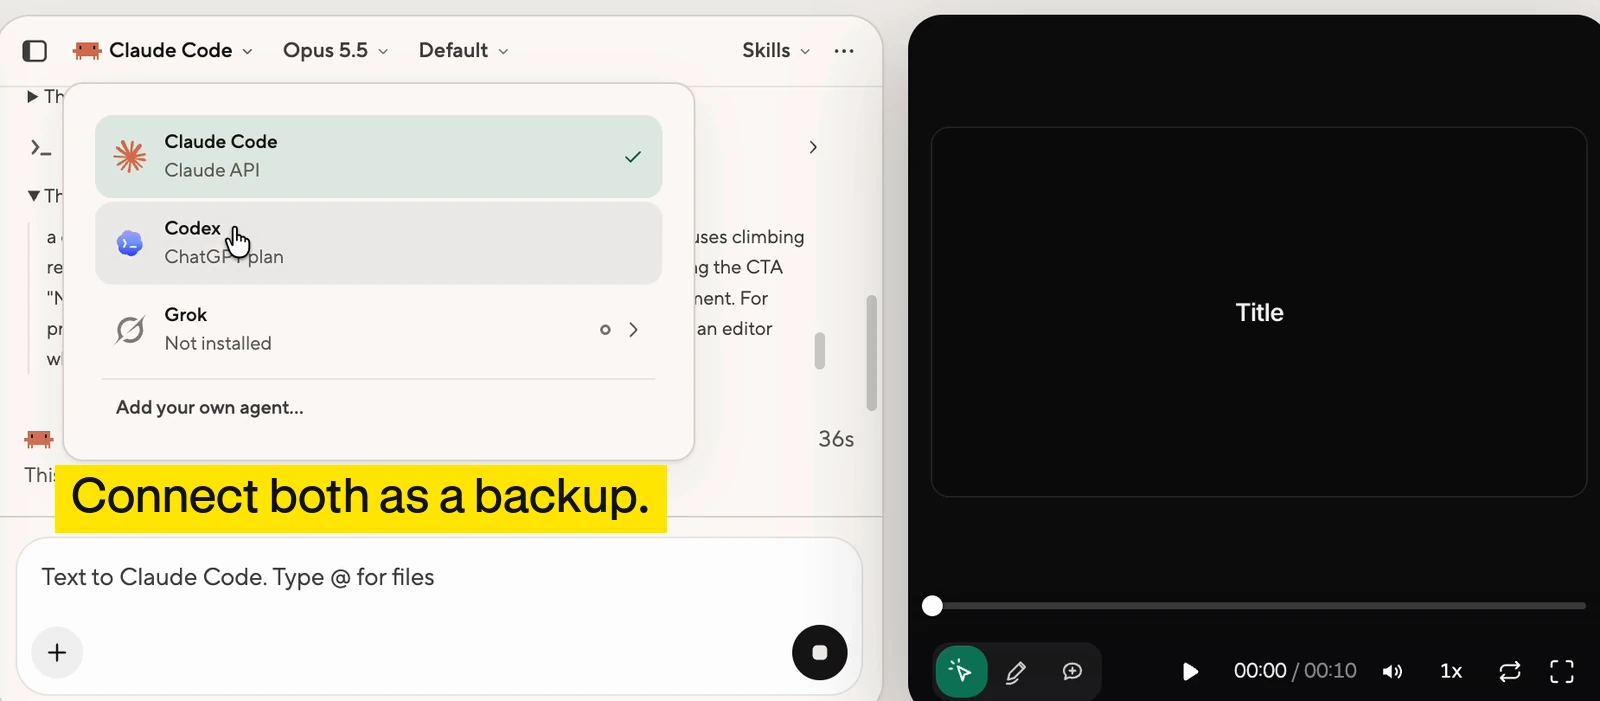
2. Pick your AI. You choose which AI does the work. I’ve got Claude and Codex hooked up, so if I burn through my usage on one, I just switch.
3. Draw on the screen. This is the part that sold me. Instead of describing where something is, I just circle it. Make this bigger. Slow this down. It knows exactly what I’m talking about.
4. The timeline. If you’ve ever touched CapCut or iMovie, you already get it.
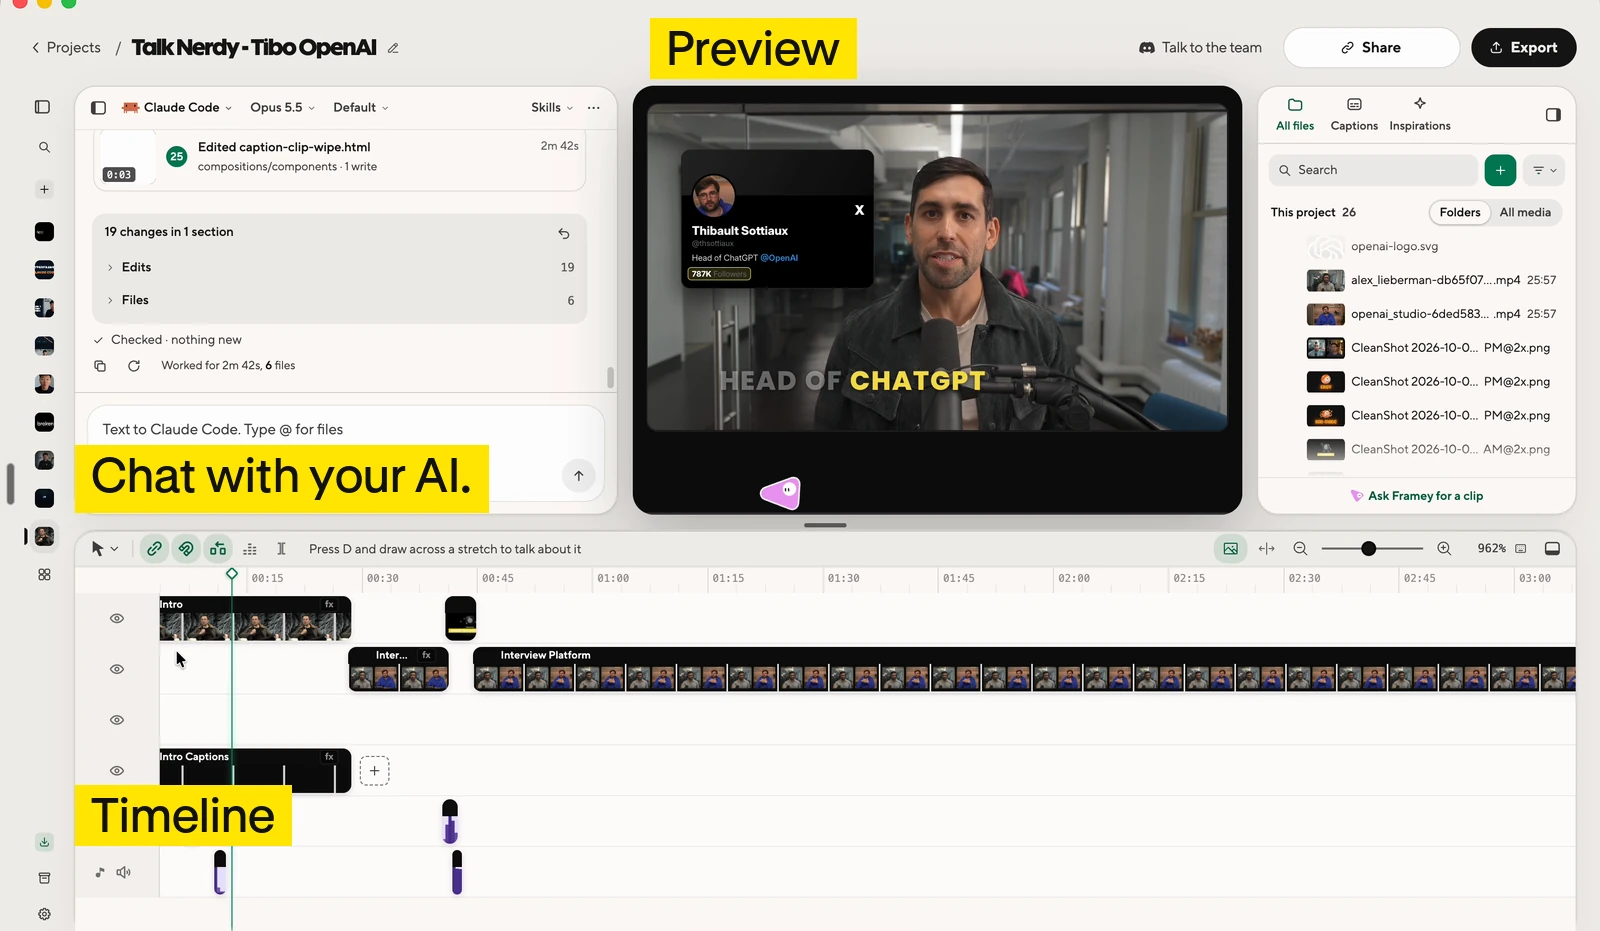
Fair warning: it’s a day-one app, and the team is shipping several updates a day. When I started, undo was kind of broken. Two days later, it was fixed. The feedback button is always onscreen and the devs have been super responsive, so don’t hold back!
What You Can Make with HyperFrames Studio: 5 Real Examples
Every prompt below is in the free prompt pack.
1. A product launch video from one prompt
When you open the app, it basically says: paste your website, pick an inspiration, go. So I did that for Tenex.
It looks flashy. But if I’m being honest, it felt like AI slop. And I don’t think that’s because of our branding; it just did generic work. Great party trick. Not something I’d actually post.
2. PDF, Excel, or blog post to video
This is where it gets useful. You can hand it basically anything: a spreadsheet, a PDF, a link. I turned an Excel file into a vibrant slideshow video, a blog post into a social infographic, our newsletter page into an ad, and a static webinar page into a promo.
If you’ve got a deck sitting around that nobody reads, this is how you turn it into something people actually watch.
3. Editing a 25-minute podcast: intro, archival footage, and AI captions
This is the one that surprised me. I gave it a full episode of our show, Talk Nerdy, and asked for a real intro with archival footage and sound effects.
One prompt got the main layout, visuals, and cuts about 85% of the way there. Three more fixed some glitchy transitions. I also had to push it harder to pull real archival footage from the web instead of dropping in placeholder article headlines.
And the captions are HyperFrames’ own caption templates. Honestly, they rival CapCut.
4. An app promo video from a single description
No inspiration, no template. Just me describing my vision: a nostalgic promo for a Pokédex app on the upcoming iPhone Duo.
I was kind of impressed. Not perfect, and it’d need a few more passes, but it came from nothing but a short description.
Out of curiosity, I ran the same idea straight in Claude Code with Opus 5.5, no Studio. It built everything in code with Remotion: the phone, the screens, the camera moves, even a soundtrack it generated from scratch in Python. It checked its own work by rendering still frames and looking at them. That version came out better. My conclusion is that the terminal still has the higher ceiling; Studio is the easier way in.
5. A talking-head video for social media
Just me, my phone, and 30 seconds of talking. It added captions, graphics, and zooms. There were still quirks: a few ghost frames, some awkward transitions, and pauses that run a little long. It took one more prompt to be usable.
Tips for getting good results in HyperFrames
- Don’t trust the default. One sentence gets you AI slop. Give it your brand assets, a few references, and clear rules, including what not to do.
- Plan the video before you open the app. Whatever you type in the box is what it makes. It won’t help you figure out the idea, so have the beats, the style, and the references ready first.
- Ask for real footage. If you want archival clips, say so plainly, or it may use placeholders.
- Turn up the reasoning. When you shift from Medium to Extra, you’ll feel the difference.
The good, the bad, and the ugly
The good
- The inspirations library. It keeps growing, and it’s the fastest way to get unstuck.
- Drawing on the screen. I don’t think I can go back to writing out timestamps.
- More than one AI. If you pay for both Claude and Codex, you’re not stuck when one runs out of usage.
The bad
- The default doesn’t look good. You need a lot of references and detail to get something you’d want to post.
- It won’t help with the idea. It’s built to execute, not to brainstorm. I’d love to see more robust pre-production functionality added.
The ugly
- It feels like a day-one app. Because it is. There are some clunky UI features that need to get ironed out.
- Moving around the timeline is clunky. I want arrows to jump between clips and in and out of them.
- Stuff gets disorganized quickly. I want project folders and a stronger asset library: logos, music, things I use every time. You can pull in a whole past project as inspiration, but it’s not clear how to grab just one piece of it.
Who should use it (and who should wait)
Use it now if you’ve been prompting Higgsfield or Nano Banana and thinking, “Okay… now what?” This is the now what. It’s the easiest on-ramp to video editing I’ve ever seen.
Wait if you already live in Premiere or Final Cut. It’s nowhere near as smooth yet. Me personally, I’m still in Final Cut with Claude hooked up to it through an MCP connection.
Where HyperFrames fits in a full AI video workflow
HyperFrames Studio is great for motion graphics, titles, and quick social edits. It’s not where I come up with ideas, write scripts, or do my main edit. For the whole process, from idea to script to shoot to edit to packaging, I broke it all down in this video where I reveal my full creative process.
What’s changed
Straight from HeyGen’s official release notes, newest first. User-facing changes only.
| Date | Version | What changed | What it means for you |
|---|---|---|---|
| Oct 6, 2026 | v0.8.139 | Built-in transcription now runs inside the desktop app; drags after a resize, undo, or reload land where you pressed | Captions and talking-head edits need one less outside tool |
| Oct 6, 2026 | v0.8.136 | Fixed app launch crashes and preview stalls caused by some image links | Fewer freezes when your video pulls in images |
| Oct 5, 2026 | v0.8.135 | Undo takes back your last edit, even right after a resize or nudge | Command Z now does what you expect |
| Oct 5, 2026 | v0.8.129 | Undo works on your first edit, even while media is still copying in | Safe to start editing before imports finish |
| Oct 5, 2026 | v0.8.134 | Official Studio app docs published for Mac and Linux | The setup steps above follow these docs |
Get the prompts
Every prompt from this post, plus the setup I use so it can work without me watching, is in the free HyperFrames prompt pack.
Common questions
Questions leaders ask us
Is HyperFrames Studio free?
Yes. The app is free and open source. You pay for the AI that does the work (Claude, Codex, or Grok).
Who makes HyperFrames Studio?
HeyGen.
Does it work on Windows?
Not yet. It's on Mac and Linux now, with Windows coming.
Do I need to know how to code?
No. You chat, click, and draw. You just need to connect an AI account first.
How is it different from HyperFrames?
HyperFrames is the engine your AI used from the terminal. Studio is the visual app on top of it.
HyperFrames vs. Remotion?
The two have always been almost the same idea: video made from code. Now that HyperFrames has a visual app, it has a huge leg up on Remotion for anyone who doesn't want to live in the terminal.
Can I make my own templates?
You can tag your own past projects with @ and remix them.